Lesson With No Good Title
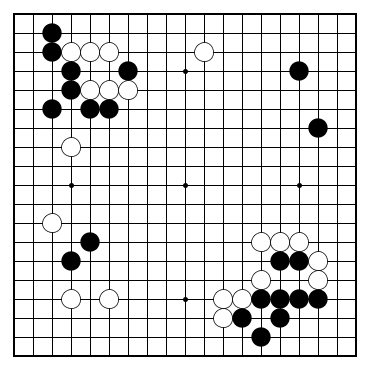
Black to play.
A quick evaluation shows that the lower left area is "hot": Black has the group made of two stones in the kosumi formation that is still unsettled and has to do something about it. Think of several ways of accomplishing that, each with a few follow-up moves, then compare the results.
 Dia 1
Dia 1
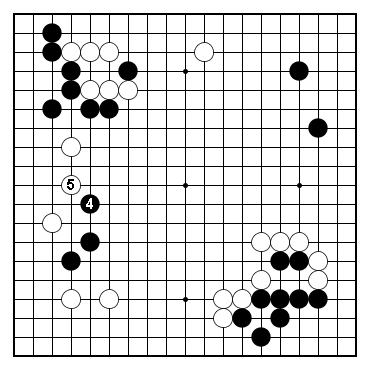
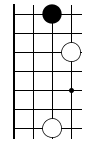
One common technique is to expand one's weak group in an active way, like putting pressure on the opponent's weak position. Dia 2 is one such instance of it. White will be happy in this case to defend on the left side, and stop worrying about any Black invasion in that area.
This looks too mild on White. Let's try to play more severe, and take advantage of the fact that White is weak on the left side, while Black has a lot of thickness just above.
 Dia 2
Dia 2
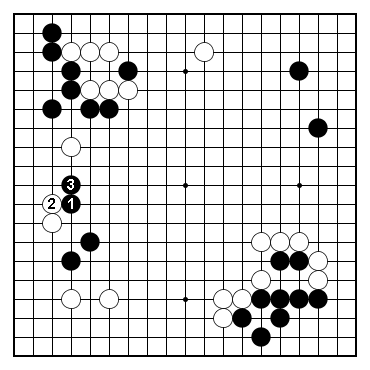
One obvious way to take advantage of White's thin position on the left side is to invade directly, like in Dia 3. White won't try to connect his stones on the left, though, in this case - that would result in one heavy White group - but he'll pretend for now that he doesn't care about his stone above, but he'll focus on attacking the weak Black group below.
Given that he has a weak group below, Black's direct invasion cannot be too effective. Black has to find another way.
 Dia 3
Dia 3
Here's a good way to defend Black's weak group while taking advantage of the weak White position on the left.
 Dia 4
Dia 4
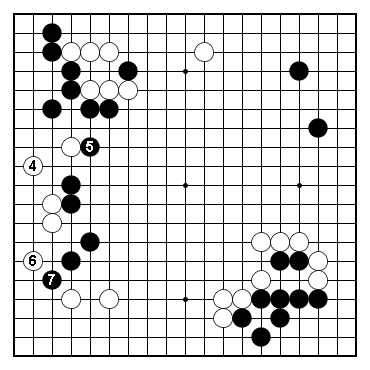
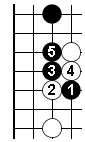
The whole idea is that White cannot easily connect his stones. If White tries to connect with 4 in Dia 5, Black plays 5 and White cannot connect. Meanwhile, Black's weak group grew stronger. This result is clearly better for Black compared to Dia 2.
 Dia 5
Dia 5
White can try to connect with 4 in Dia 6 - and he does connect - but his shape is pretty weak now. Black can for instance play 5 and connect his group below with the one above, while the White group has to make eyes next. If White expands with 6, Black is happy to play 7 and reduce White's corner. This result is not good for White - Black did profit very nicely from White's original weakness on the left side.
 Dia 6
Dia 6
Let's analyse here White's shape on the left - Dia 7 is "dissecting" the left side and it only shows the White position in that area. This is a common thing to do when we play - we reduce complicated positions to simple ones we already know, in order to reduce complexity. In Dia 7, the most common way to play for Black is to invade at A - at which White usually responds with B.
Another way for Black is to play at C, in an attempt to separate the 2 White stones; if White D, then Black A.
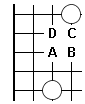 Dia 7
Dia 7
It would be a gross simplification to reduce the problem in Dia 1 to Dia 7 - after all, we decided in Dia 1 that the main issue for Black is to settle his 2 stones in the lower left area.
One very important aspect we missed because of the simplification in Dia 7 is the Black's position in the vicinity of White's 2 stones. Most important in this case is the presence of the Black's stone on the third line - shown here in Dia 8. That stone opens a whole new set of opportunities for Black - and it makes possible the severe cut with Black 5 in Dia 5.
 Dia 8
Dia 8
In Dia 9 we show another local possibility for Black that is made possible by the presence of the Black stone on the third line: Black can play 1 in Dia 9 - which normally only results in helping White to connect his stones - and then cut with , and connect with 5. This is not necessarily interesting in the context of Dia 1 - since White will follow Dia 3 instead of White 2 in Dia 9 - but I thought I will mention it just to show how many possibilities are lost if we simplify too much.
 Dia 9
Dia 9
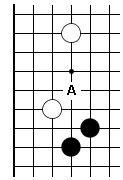
Yet another classical pattern we find locally is the one in Dia 10. Locally, Black A is a good next move for Black, since it develops his own group while putting pressure on White.
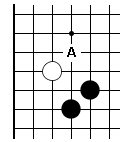 Dia 10
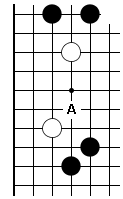
In Dia 11 we expanded from Dia 10, by taking into account White's stone above. In this pattern, due to the presence of the White stone above, Black A is not an option anymore: that is because if you visualise White answering on the 3rd line and Black pushing on the 4th line, Black will eventually "bang his head" against the White stone above, which is not good locally.
 Dia 11
Once we expand our view even more, though, and take into account the presence of the Black stones above the White position, A becomes an option again. Except that, while in Dia 10 the purpose of A was just to get outside influence for Black, in Dia 12 the purpose if more aggressive: Black aims at separating the White stones - just like in Dia 5.
 Dia 12
This lesson is missing a good title. I changed the title as least 2 times - the previous one was "Don't over simplify", but that still only touched on part of the problem. In lack of a good title, let me try to explain why I chose this for a lesson. The reason I missed the simple sequence shown in Dia. 4 and Dia. 5 is, I think, because I was thinking too "strategically" at that point: there are only a few stones in the bottom left area, right, so it's easy to feel that it's still fuseki time. Well, that's bad simplification, and no, it's not fuseki time anymore, since Black has a wall in the upper left, and White has one in the bottom right. So it is middle game time, and that means one should put the tactical hat on as well, not just the strategy one.