Fighting techniques - kikashi
Definition: Kikashi
Many Western Go players mistakenly think kikashi is the same as a "forcing move", but that is not true: in the Japanese Go jargon, kikashi is a move which forces the opponent into a disadvantageous situation, or at least brings some advantage to the side that plays it.
Just playing an atari and force the opponent to respond is not kikashi - that is just a forcing move. Doing that blindly may actually hurt the side that initiated it, for instance by filling one's own liberties, or losing ko threats, or just wasting other local possibilities.
This article will first present a very common sacrificing and kikashi technique, followed by a not so common tesuji that can be used sometimes to resist against the opponent's kikashi attempt. The basic position is from some variations for move 33 in the 4th game of the 2007 Honinbo title.
Black to play in diagram 1. Evaluate the position first, make a strategical decision and also think how to put that into practice (including a few variations).
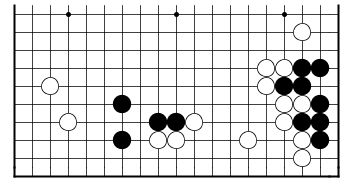 Dia. 1
Here is my evaluation: the triangle marked Black group on the middle of the lower side is not stable yet: it should either try to build a base on the side, or strengthen itself in the center. Also, White's position in the lower right is very solid, there is no chance for Black to invade that X marked area, hat is pretty much White's territory.
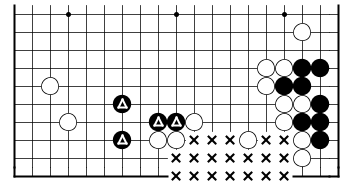 Dia. 2
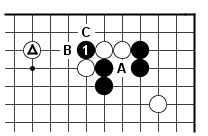
Black wants, ideally, to get both A and B in sente in diagram 3: both threaten to cut at 1. The problem is that if Black starts at A, White can defend at C and then Black B is not sente anymore. On the other hand, if Black starts with B, after White C a move of Black at A is not sente anymore.
For Black to attempt to get both A and B in sente, a common technique is to sacrifice some stones by cutting directly at 1 in diagram 3.
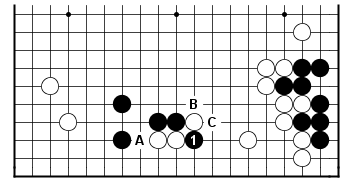 Dia. 3
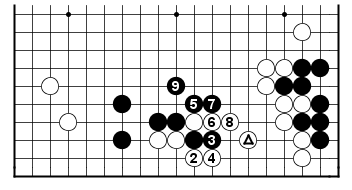
Diagram 4 shows a common continuation: White can safely capture Black's cutting stone. Black is adding a second sacrifice stone with 3 (following the proverb "Sacrifice 2 stones instead of one") - which is key to him getting kikashi moves on both sides. After White 4, Black gets to play at both 5 and 7 in sente (these are A and B in the previous diagram). As an added bonus, Black also gets 9 in sente. Once Black is done with his sente moves, he can reinforce in the center, with 11 (to prevent a White cut below that).
This result is very good for Black locally: he got a very strong shape, and forced White from both directions - cannot hope for anything more than that. White's position on the lower side is reinforced, but as we concluded in diagram 2, Black doesn't mind that, since that was White's territory to start with.
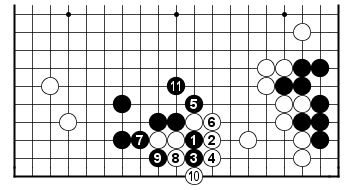 Dia. 4
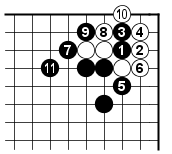
Example 1 shows a situation where White's only choice is to simply capture, as in diagram 4. The sequence in example 1 is an old joseki. Black sacrifices two stones and gets moves 5, 7 and 9 in sente.
 Example 1
Diagram 5 shows an alternative way for White to respond to Black's cut: with the triangle marked stone in place, White can also capture by playing atari from below to start with. This way Black doesn't get A in diagram 3 in sente anymore, but he gets 2 sente moves in the center.
 Dia. 5
Example 2 shows a common situation where White is better off playing atari from below instead of capturing. Again, the key to this is having the triangle marked stone in place, which allows White to play atari at C (followed by Black B and White on the left of C). White's reason to do this (instead of capturing the cutting stone with B) is that he wants to keep alive the possibility to cut with A. Also, capturing with B will make White over concentrated (with the triangle stone in place), and let Black play several kikashi from the center, besides the cut at A not working anymore for White.
 Example 2
Back to our initial problem now: the result in diagram 4 is too good for Black - White cannot tolerate that. Let's go back to diagram 3, just after Black's initial cut, and think about the best way to respond to the cut from White's perspective.
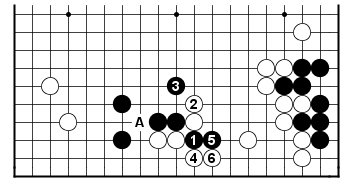
Diagram 6 shows the strongest way for White to respond to Black's cut: White should first play kikashi by extending upwards with 2, which threatens to play hane at A; Black has no choice but to defend against White A (Black 3 defends while making good shape); next White goes back to connect underneath, denying Black's kikashi on the third line (A in diagram 3). White 2 is according to the proverb "Play kikashi before defending" - but it's not an easy to find move, unless one knows about this tesuji already.
The reason why diagram 6 is much better for White than both diagram 4 and diagram 5 has to do with both the strength of the Black's shape (in diagram 6 Black didn't get any of A or B from diagram 3) and with the size of White's territory (which is one line higher in diagram 6).
A natural question then becomes: did Black fail by cutting at 1 in the first place, if White has the tesuji at 2? That certainly depends on the situation, but in this particular case I think it is still good for Black to cut with 1, even if he cannot achieve the exact goals in diagram 3. Instead, Black has now several kikashi from the center (after he blocks above White 2), which may be interesting for Black, depending on the global situation.
This exact position didn't occur in the actual Honinbo title game - diagram 1 is from variations on move 33 - but the sequence from 1 to 6 did occur in the game much later, on move 113. The local position was much more complicated on the left, but White's tesuji/kikashi with 2 still worked.
 Dia. 6
Conclusion
Kikashi is a very important concept it Go: sometimes when we can force the opponent to respond in a certain way we are gaining an advantage.
Consequently, it is very worthwhile to avoid being forced. This is one reason many professional Go games are so complicated, because professionals commonly play tenuki - ignoring the opponent moves in an attempt to prevent the opponent to dictate the course of the game.
Further study
I just finished reading a wonderful book about kikashi: "Beyond Forcing Moves", by Takagi Shoichi - seems to be out of print, but I found an old copy at my local library in the US. I warmly recommend it.