Kosumi-Tsuke: Use and Abuse
Introduction and theory
This article is about a very common move in Go, called "kosumi-tsuke", with some examples about when it is good and when it is not good to use. The author published a version of this article in an online Romanian Go journal, a few years ago.
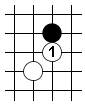
Let's start with some definitions. "Kosumi-Tsuke" is a combination of 2 moves, as one can see from the diagram below: "kosumi" (which in Japanese literally means "small corner" - a diagonal extension from one's stone) and "tsuke" means "attachment" - playing in contact to the opponent's stone.

| + |

| = |
|
It is quite uncommon to ignore a kosumi-tsuke: if Black plays elsewhere, White 3 in Dia. 1 creates an ideal formation for White, and the Black stone only has 2 liberties left.
 Dia. 1
The most common answer to kosumi-tsuke is to extend from the attached stone to strengthen oneself, as in Dia. 2a:
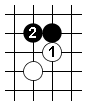 Dia. 2a
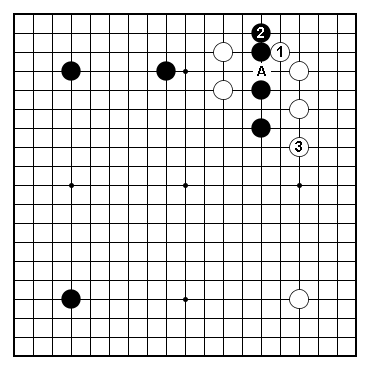
Once Black extended in Dia. 2a, White normally plays one more move locally (the reason for that is shown later, in Dia. 2c).
White 3 (ikken-tobi) in Dia 2b is the most common continuation; other popular options for White are A (an aggressive keima move, putting more pressure on Black compared to White 3), B (keima in the other direction, this is more common when White is defending a corner), C (hane, this is also usually for defending a corner), and D (which is very much in the spirit of A, to put pressure on Black).
 Dia. 2b
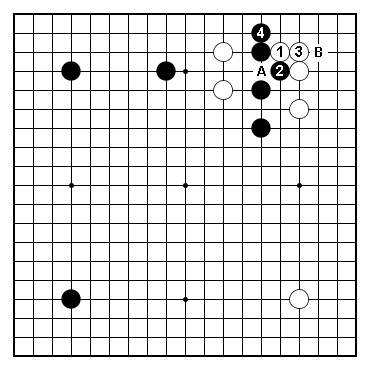
Dia. 2c shows why White normally wants to add one more stone locally, after Black extended in Dia. 2: if White plays elsewhere, Black can use his newly acquired local power by putting pressure on the White stones with Black 4 (another popular option for Black is to press with keima at A in Dia. 2c). Black can also aim at the corner tesuji with B - he actually has this option even in Dia. 2b.
 Dia. 2c
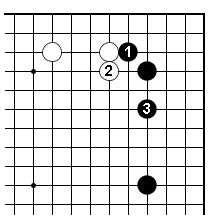
In Dia. 3 we see an example that occurs very frequently is many Go books (for instance in "Lessons in the Fundamentals of Go", in Chapter 3, Dia. 14), either to illustrate handicap-Go, or how to use a moyo, etc. The basic theory is that when the triangle Black stone is in place, it is normally advantageous for Black to play kosumi-tsuke with 1, and after Black 3 White can only extend up to 4, and Black can even continue the pressure with 5.
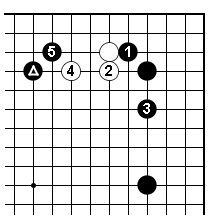 Dia. 3
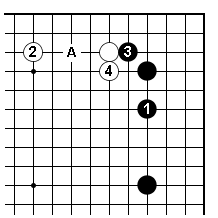
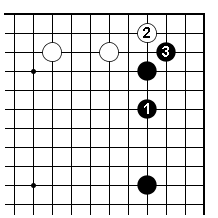
For comparison, if instead of playing kosumi-tsuke in Dia. 3 Black directly plays at 1 in Dia. 4, White can get a pretty comfortable position with 2 and 4.
 Dia. 4
Back to Dia. 3 for a second: the idea for Black was to make White heavier by forcing him to respond to kosumi-tsuke with 2.
On the other hand, one shouldn't forget that White also becomes stronger when he responds to a kosumi-tsuke. In Dia. 5 we see an example when, according to Go theory, Black shouldn't play kosumi-tsuke: if he does, White makes good use of his stronger group and can extend as far as White 4.
 Dia. 5
To digress just a little: one more reason why Dia. 5 is bad for Black locally is shown through this tewari analysis: if in response to Black 1 White extended to 2 in Dia. 6, Black has a good invasion at A later; but by exchanging 3 for 4, Black is ruining that opportunity for himself.
 Dia. 6
As opposed to the previous diagram, in Dia. 7 White's extension on the upper side is narrower, so Black cannot invade. In this case, it makes sense from a local perspecive to play kosumi-tsuke before extending at 3.
 Dia. 7
In Dia. 7, Black tries to take advantage of the position; he can of course extend directly at 1 in Dia. 8 instead, and things get back to the normal joseki after White exchanges 2 for 3. Black may feel a bit of a lost opportunity.
 Dia. 8
Problems and examples from actual games
After the introduction from the previous section, lets see some examples from actual games, covering both cases when kosumi-tsuke is good and cases when it is bad. Kosumi-tsuke can be a terrific attacking weapon, but it can also backfire when misused:
GOOD: kosumi-tsuke makes the opponent heavy.
BEWARE: kosumi-tsuke also makes the opponent stronger.
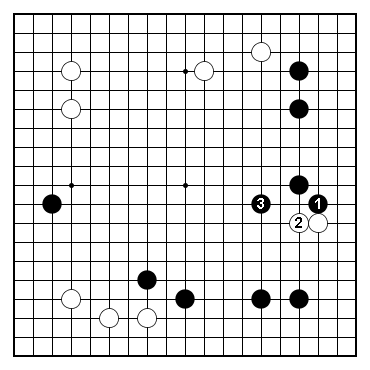
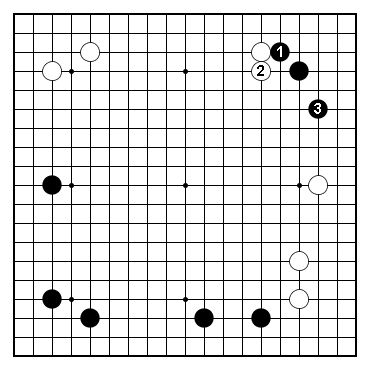
White to play in Dia. 9: is kosumi-tsuke good or bad?
 Dia. 9
Kosumi-tsuke is ideal in this case: in Dia. 10 White reinforces his positions on both the upper-side on lower right side while attacking the Black invader.
By the way, by playing kosumi-tsuke from a 4x4 stone, like in this diagram, White doesn't capture the entire corner, it just makes more difficult for Black to invade in 3x3. Black can invade at A, but White can respond at B (or descend from his 1 stone) and if Black lives in the corner, his outside group will become even weaker and more vulnerable to future attacks.
 Dia. 10
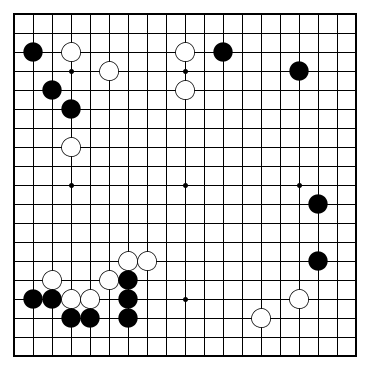
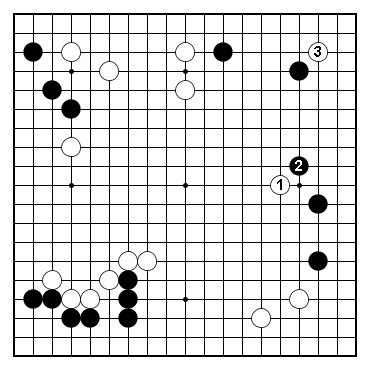
Black to play in Dia. 11. Kosumi-tsuke in the upper-right corner: good or bad?
 Dia. 11
It is very bad for Black to play kosumi-tsuke in this case. If he's looking only 5 lines below his hoshi stone, the position looks ideal for the kosumi-tsuke because of the 2 black stomes below, but a global analysis shows that White is very strong both on the right side and on the left side, and Black's stones will come under attack.
After White jumps out with 6 in Dia. 12, he has A and B miai next to put pressure on Black.
 Dia. 12
In a case such as the one in Dia. 11, when the opponent's nearby groups are thick, we don't want to make his stones any stronger, so Black should just play cautiously 1 in Dia. 13. Basically, kosumi-tsuke is an aggressive move: when the opponent has thickness, we want to defend, not to play aggressively.
 Dia. 13
So far we only showed examples with kosumi-tsuke being played from a hoshi stone, in response to an approach move. But kosumi-tsuke can be used in other situations as well. Dia. 14 shows such a situation, where Black can play kosumi-tsuke against the White invader on the right side. But is that a good decision or not?
 Dia. 14
Black only has 3 ways to tackle White's invasion: to cap it and build a moyo in the center, to approach it from above, or to approach it from below. The capping move doesn't look too promissing in this case, because the center is too open for Black to hope to make enough territory there.
The approach from below is showed in Dia. 15 and again it looks too soft: White lives easily in the middle of Black's moyo, while the lower right corner is still vulnerable to a 3x3 invasion. Black should play more aggressively.
 Dia. 15
Black's third approach is to play from above: kosumi-tsuke is very good in this case, it makes White heavy (by denying him the slide on the second line, in Dia. 15) before attacking him.
Both Black 3 and the move one point above it in Dia. 16 are standard follow-up moves after kosumi-tsuke; in this case Black has a lot of supporting stones in the neighborhood so he chooses the more aggresive of the two.
 Dia. 16
Next problem: White to play in Dia. 17.
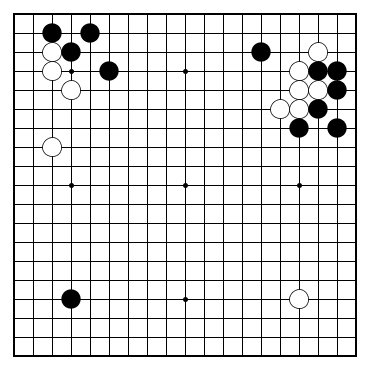 Dia. 17
First a bad choice: White 1 in Dia. 18 is a slack move. Black can either cut at A directly (and sacrifice on a very small scale the stone that White tries to put pressure on), or he can continue with any of B, C or D, taking advantage of the cut at A indirectly. With so many choices for Black, it is clear that White should try to do much better than 1 here.
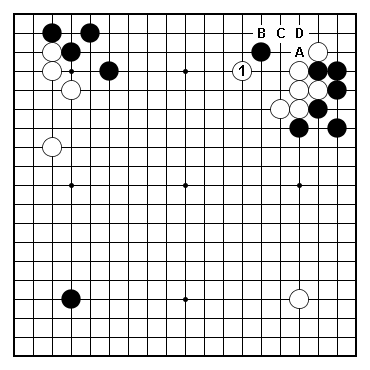 Dia. 18
Kosumi-tsuke to the rescue! If Black makes the standard reply at 2 in Dia. 19, White makes the forcing move with 3, then attacks with 5. White's stones in the corner are pretty strong, so White should be able to handle himself in this fight.
This is a good example of using kosumi-tsuke to make the opponent's stones heavy. In this case White is also protecting the cutting point at A in Dia. 18 at the same time.
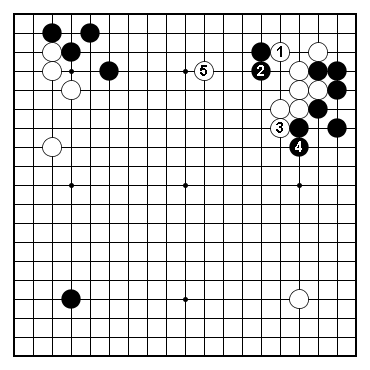 Dia. 19
Next problem, White to play in Dia. 20.
 Dia. 20
If your answer is to play kosumi-tsuke with White 1 in Dia. 21 because you recognized the pattern in Dia. 7, congratulations on your pattern matching skills!
But this is a bad move, sorry for the previous joke. The theory in Dia. 7 was that it may make sense from a local point of view to take advantage of the narrow extension and play kosumi-tsuke. In this game, though, White is building a moyo towards the center, on the left side; if White plays kosumi-tsuke in Dia. 21 it helps Black get stronger in the center, so White is hurting his own moyo. That's not good. In Go, global is more important than local.
 Dia. 21
As a suggestion of what White might play to take advantage of his moyo in the center, see Dia. 22: White is forcing from the center, and if Black responds around 2 then White invades in 3x3 in the upper right, taking away all the "meat" out of Black's moyo in that area.
 Dia. 22
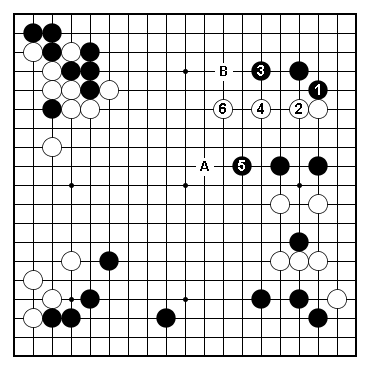
Next problem: White to play in Dia. 23.
 Dia. 23
The upper side is a very large and urgent area: White has invested a lot there, but Black's shimari in the upper left is facing the same way. Whoever plays first in the upper left will be quite happy. In Dia. 24 White does agree with the value of the upper side, but first he wants to play kosumi-tsuke in the lower right corner as a forcing move (followed by the 3-4 forcing sequence) with the goal of protecting against the 3x3 invasion in that corner in sente before taking the very large point with White 5 on the upper side.
 Dia. 24
While the forcing sequence in the lower right corner in Dia. 24 is a standard one, it is being misused in this case. The reason is that Black has a weak point at B in the lower right. For that reason, White should better extend directly at 1 on the upper side in Dia. 25; if White later gets a chance to play at A, the invasion at B will be a nice follow up. In Dia. 24 White destroyed this opportunity for himself by playing kosumi-tsuke.
 Dia. 25
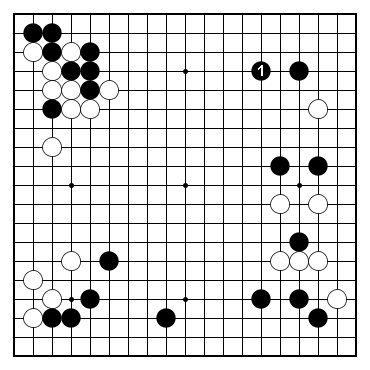
Another problem, with a lot of ikken-tobi. White to play in Dia. 26.
 Dia. 26
White definitely wants to extend in the direction of 3 in Dia. 27, but before doint that kosumi-tsuke with 1 is a very good forcing move: in creating a cutting point with A, White is helping his 2 stones on the left. Basically White can play at A later and cut Black in 2 pieces.
 Dia. 27
Black can defend against the cut at A in Dia. 27 by forcing 2-3 in Dia 28. But this is a "thank-you move" though from White's perspective, since now he doesn't need to worry anymore about a Black invasion at B.
 Dia. 28
Don't feel bad in case you missed any of the all-board problems so far: all of them have been chosen from the author's insei league games in Japan, and in all of them the author made the wrong choice...
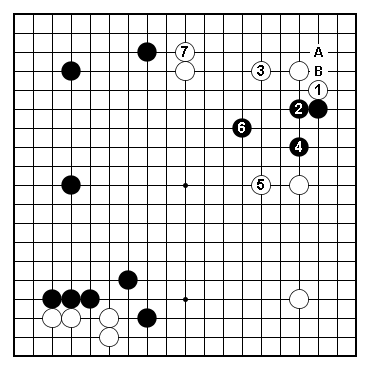
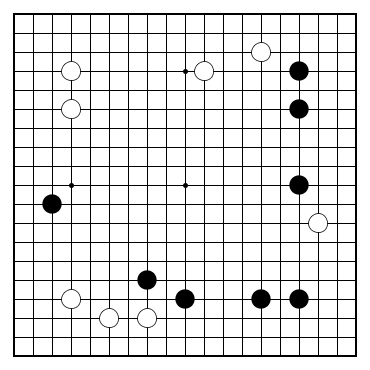
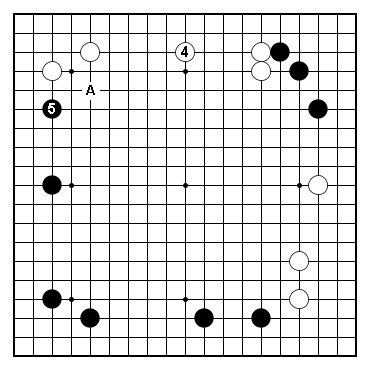
But enough insei nonsense: let's conclude this long article with an example from a masters' game: Mizutani Junsaku (6 dan) played Black in 1844 against Shusaku (not yet Honinbo, just 4 dan at that time). Black to play in Dia. 29. (By the way, this is game 10 from the "Invincible - the games of Shusaku" super-book)
 Dia. 29
A common move would be for Black to extend directly to 3 in Dia. 30. Black played kosumi-tsuke first, though. This is against the normally accepted Go theory - see the explanations for Dia. 5 and Dia. 6.
 Dia. 30
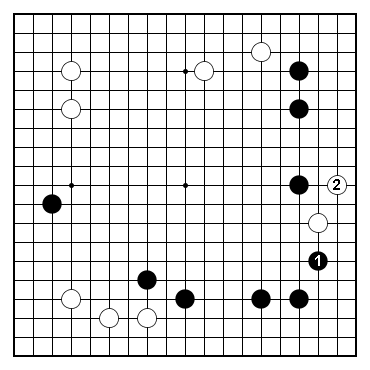
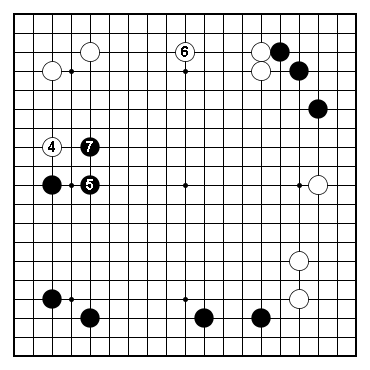
The reason why Black played this anti-theory way is because he made a whole board assessment that this is to his advantage. Following from the previous diagram, if White extends at 4 in Dia. 31 - which is ideal from a local perspective - Black plans to extend at 5, which is ideal from a global perspective. Not only would White be very flat on the upper side, but Black has an excellent follow up with A.
Again, global is more important in Go than local.
 Dia. 31
White (Shusaku) of course didn't fall for Black's plan, but extended at 4 in Dia. 32. Black had a chance at this point to attack around 6 on the upper side, but he preferred to expand his lower left moyo with 5, making 6 and 7 miai next.
White played 6 in the game, to which Black responded with the excellent 7 in Dia. 32.
Don't be discouraged when seeing professionals seemingly play against the Go theory that we learn: that should be just another reason to enjoy Go even more for being such a wonderful, open and unpredictable game.
 Dia. 32
Conclusion
Kosumi-Tsuke
GOOD: it makes the opponent heavy.
BEWARE: it also makes the opponent stronger.