How to Estimate a Position by Changing the Order of Moves (Tewari)
I am going to show you how to estimate a position by changing the order of moves and reducing it to some position you already know. This kind of analysis is called tewari in Japanese.
This was shown to me in Japan by one of the official insei instructors, Aragaki Takeshi 9 dan pro. He confessed that it was the famous Takemiya Masaki how showed this to him.
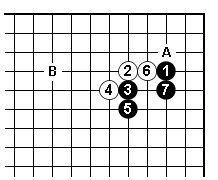
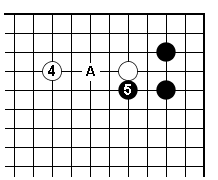
Dia 1 shows the beginning of a joseki. White's usual follow up moves are A and B.
A leads to immediate complications, while B is very peaceful. As a result of reading joseki books, what I "knew" was that A is the only real move here, while B is nothing but a very lame compromise, at least from a local perspective
. Dia 1
Dia 1
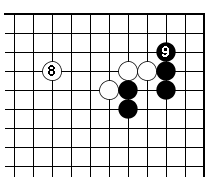
Let's first have a look at A, which is White 8 in dia 2. Notice how each one cuts the opponent's position in a somehow symmetrical manner. After Black descends with 25 in the 2x2 point in the corner, White has to decide between A (followed by Black attacking with C) and B (which is more active, but Black gets to close at D in sente).
 Dia 2
Dia 2
Dia 3 shows variation B for White in dia 1 - the one that's supposed to be too slow for White. Black gets a solid position in the corner, while White is developing towards the left - but has no territory yet.
 Dia 3
Dia 3
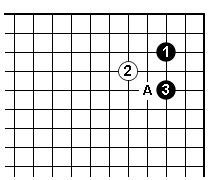
In dia 4 we start the tewari analysis. We try to get a "second opinion" on the result in dia 3 by finding another sequence of moves that leads to it - hopefully a sequence that is easier to judge.
We start with Black 1 in 3x3 - a common way to occupy a corner. It used to be popular in the past, but it is not seen much nowadays. Anyway, so far so good.
White 2 in dia 4 is a common approach move. Black 3 is OK - at A it looks more aggressive, but it cannot really be criticised.
 Dia 4
Dia 4
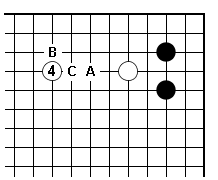
Let's have White extend at 4 in dia 5 as his next move. This is not a good move: given Black's solid position, White is extending one line too far, practically inviting Black to invade at A.
Instead of 4, White should extend at B or C in dia 5.
 Dia 5
Dia 5
Now let's make Black play the contact move at 5 in dia 6. How is this move?
Given what we just said about the previous diagram, it looks like Black is throwing away the invasion at A. This can't be good, Black should invade at A instead to take advantage of White's mistake. By playing in contact instead of invading, White's over-extension with 4 turns into a good looking move.
 Dia 6
Dia 6
Dia 7 concludes our analysis: White 6 to Black 9 are all natural moves. So we found a sequence that leads to the same result as dia 3. All moves are more or less OK, except for White 4 and Black 5 in dia 6. Given that Black made the last mistake, the result cannot be bad for White.
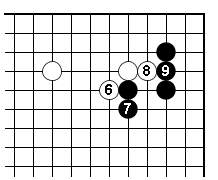 Dia 7
Dia 7
Conclusion
When in doubt about a position's outcome, try to find another sequence that leads to the same position, such this new sequence is easier to judge. Then you have to see who makes the last bad move in the new sequence (that is usually the one whose final position is worse), and in general which of the bad moves are still bad in the end - sometimes a bad move turns into a good one with the opponent's "help".