Direction of Play... and Bad Habits (1)
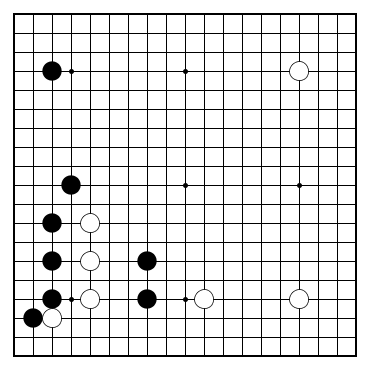
White to play next.
This game is in the fuseki stage. Most of the moves we make in the beginning of the game have a profound impact, they shape the whole game to follow. One should be very careful especially when there are several choices - choose a bad move and you'll have a painful game.
Think for yourself where you want to play next with White, and why. Try to come up with at least 2 fundamentally different moves, think of pros and cons for each separately, then compare them and make your final choice.
 Dia 1
Dia 1
Let's narrow the discussion down to two choices now, A and B, both in the lower-left. There are two weak groups there, while everywhere else there are only large moves, no urgent moves. When there is just one weak group that's already a sign of an important area - while two weak groups close to each other means that the area is really steaming hot.
The contact move at A is a "leaning move" - White wants to get out in the center and strengthen himself.
The capping move at B is pretty standard in this position: White wants to get out into the center while attacking Black.
So, which one would you choose? Don't forget to think of a few continuations in each case - just choosing moves statically isn't good enough.
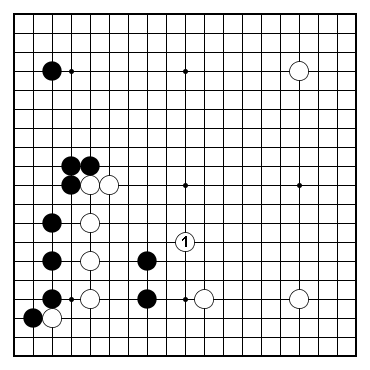
 Dia 2
Dia 2
Let's start with the capping move. This is what I played in the game, by the way - it is my "reflex move" in this type of running race
Locally this is not a bad choice - after all, White gets the initiative, and gets into the center first while attacking Black.
The bad news is that White is chasing Black towards the right hand side (Black will answer around A), which is all White's potential area. It's not a good idea to chase your opponent towards your own potential area - because you are ruining your potential.
 Dia 3
Dia 3
Let's look next at the contact move. It is natural for Black to play hane with 2, White extends with 3 and Black connects at 4. Where does White play next? Keep in mind our conclusion from the previous diagram: White's potential is on the right hand side.
 Dia 4
Dia 4
White 1 in Dia 5 is the right direction of play. White has just built thickness on the left with his contact move (at the expense of making Black thicker on the left hand side, too) - it is time to put it to good use and attack the weak Black group by driving it towards the White thickness, and expanding the White potential area on the right at the same time.
 Dia 5
Dia 5
Conclusion
- Judge globally first, start thinking from the big picture.
- Don't fall prey to your own bad habits: "reflex moves" have to pass the thinking test before actually being played.
Further study
- The Direction of Play
by Kajiwara Takeo